Configure Reconciliation Policy
You can create a data reconciliation policy between two assets of similar type or between assets that can be profiled.
To create a data reconciliation policy, do the following:
Click Discover from the side menu bar. The Discover page is displayed.
Search for an asset by its name in the search bar.
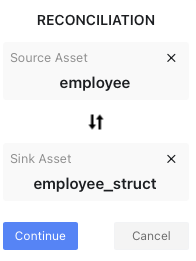
On finding the asset, click and click Add Reconciliation Policy from the drop-down list. This asset is added as the Source asset for the reconciliation policy.
Similarly, search for a second asset to be added as the sink asset, click and click Add Reconciliation Policy from the drop-down list. This asset will be added to the reconciliation panel.

Click the Continue button on the reconciliation panel. The Reconciliation Policy Configuration page is displayed.
Specify a policy name.
Specify a description for the policy.
Select the type of reconciliation match you would like to perform.
- Profile Equality Match
Profile equality match is a Reconciliation policy where the system fetches the profile of the data from both the side independently and then compares them. If the profile does not match, the policy execution fails. - Hashed Data Equality
Hashed Data equality match in a Reconciliation policy where the system joins both data sources based on the id column provided (see, use for joining) and tries to compute a hash for the complete row on each sided. It then equates both the computed hashes, and if they do not match, the policy execution fails. - Data Equality Data equality match is a Reconciliation policy where the system joins both data sources based on the id column provided (see, use for joining) and tries to evaluate the condition provided on the selected columns. If any one or more of the provided conditions on columns fail then, the policy execution fails.
- Profile Equality Match
Click Show Sample Data of source asset and Show Sample Data of Sink Asset. Accordingly select the columns for which you would like to add rule definitions.
From the rule definition panel, select values for the following properties:
- Left Column: Select the column name from the left column.
- Operator: Select an operation to compare the left hand column asset with the right hand column asset. The operators available are Equal, Not Equal, Greater Than or Equal, Greater Than, Less Than or Equal, Less Than.
- Right Column: Select a column name from the right column.
Click the Join Column checkbox to join both columns.
Click the toggle button to incrementally check the conditions by selecting one of the following incremental strategies and specifying required values accordingly.
- Auto Increment Id based Every time a new row or rows of data are added to the database, they are allotted with an auto-incrementing numeric value. For instance upon adding 1000 rows of data to the database, each row is given an id starting from 1 to 1000. On execution of a policy on the database, the first 1000 rows are taken into consideration. Lets say you added another thousand rows of data to the database. An auto increment id based strategy is used to provide values from the last incremented value of the preceding set of rows, i.e., 1001 to 2000. On re-execution of the policy, only the new set of rows is executed.
- Partition based Incremental profile uses a date based partition column to determine the bounds for selecting data from the data source. Only useful if the data source supports partition.
- Incremental Strategy Incremental profile uses a monotonically increasing date column to determine the bounds for selecting data from the data source.
In order to execute a policy on a database with incremental date based strategy, you need to provide values for the following properties:
Field name Description Date Column Select the column name that is used to save dates and time-stamps. Date Format Provide a date format to save the date time-stamp. Example YYYY-MM-DD Advance Fields Timezone: If you are from a different timezone, select a timezone from the drop-down list. Minute Offset: If the selected timezone is offset by a few hours or minutes, then enter the number of minutes in the field provided. Round End Date On checking Round End Date, the last executed date value is rounded up by the frequency that is selected from the Frequency drop-down list for the next execution of the policy. For instance, at 12:20, the last data row was executed, and you checked Round End Date and selected Hourly frequency. Therefore, the next time the policy is executed, it will only be executed on the data created at 13:20 and there after. Click Next.
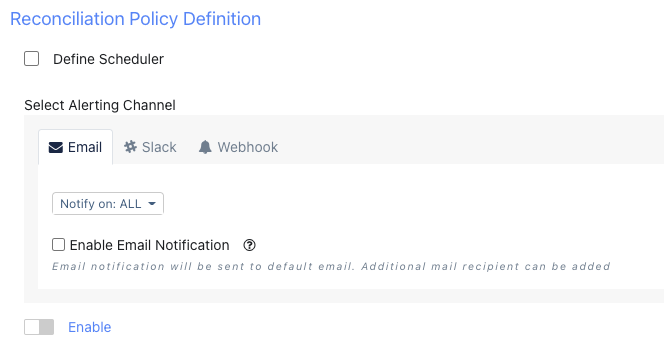
In the Reconciliation Policy Definition panel, fill in the below properties:
- Define Scheduler: Based on the time selected, fill in the time properties. Enable the Start Schedule Runs toggle.
- Select an Alerting Channel: Select one or more of the following channels to receive alerts when the data quality policy has succeeded or when an error has occurred:
note
Click the Notify on drop-down button to select whether to receive notifications only on success, failure, or both success or failure of the rule execution.
Email: Email notifications is sent to your default email. Additional mail recipient can be added to also receive alerts.
Slack: Slack notifications is sent to your default Slack channel. Additional channels can be added to also receive alerts.
Webhook: Webhook notifications are sent every time a rule execution fails.- Click the Enable toggle button to start receiving alerts.

Click Save Reconciliation Policy.